In our step-by-step guide on how to effectively clean between teeth using an oral irrigation device, we will provide you with simple and practical instructions to improve your oral hygiene routine. We understand that cleaning between teeth can be a challenge, and that’s why we want to help you make the most out of your oral irrigation device. By following our guide, you’ll be able to effectively remove plaque and food particles from those hard-to-reach areas, promoting a healthier mouth and reducing the risk of dental issues.
Enhance Your Oral Health Today
Step 1: Gather the necessary tools
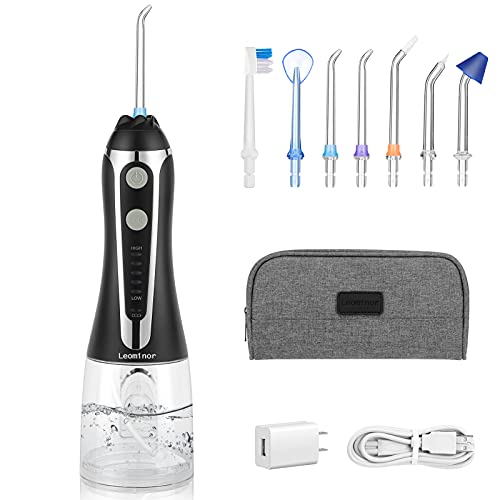
Before starting the cleaning process, gather all the necessary tools. Begin by retrieving an oral irrigation device, such as a water flosser or dental water jet, to effectively remove plaque and debris from the teeth and gums. Next, locate a water reservoir that fits securely onto the irrigation device. Finally, ensure you have a reliable power source, such as batteries or an electrical outlet, to operate the device.
Step 2: Fill the water reservoir
To fill the water reservoir of the oral irrigation device, start by pouring lukewarm water into it. Be careful not to overfill it, as this could lead to spillage or improper functioning of the device. Following these simple steps will ensure a smooth and effective oral irrigation experience.
Step 3: Choose the appropriate nozzle
When selecting a nozzle, consider your specific needs. Different types of nozzles are designed to target specific areas of the mouth, so choose one that suits your requirements. This will ensure that you get the maximum benefits from using the nozzle and achieve a thorough cleaning experience.
Step 4: Adjust the water pressure
To adjust the water pressure on your oral irrigation device, begin by selecting a lower pressure setting. This will allow you to gauge your comfort level and prevent any discomfort or sensitivity. If you find that the pressure is too low and not effectively cleaning your teeth, gradually increase it until you reach a level that is comfortable yet efficient. For example, start with a pressure setting of 2 and increase it by increments of 1 until you find the ideal pressure for your needs. Remember, it’s important to find the right balance to ensure a thorough and comfortable cleaning experience.
Step 5: Position the nozzle
To position the nozzle properly, place it at a 90-degree angle to the gum line. This angle will help target the spaces between your teeth more effectively. By directing the stream of water or air at this angle, you can thoroughly clean and remove any debris or plaque that may be trapped in those areas.
Step 6: Start the irrigation process
To start the irrigation process, turn on the device and position the nozzle towards your back teeth. Gently move the nozzle from tooth to tooth, ensuring that you clean both the outer and inner surfaces. Here are a few examples to help you visualize the process:
- Begin by placing the nozzle near the back molars on the left side of your mouth. Use a sweeping motion to move the nozzle along the gum line, making sure to cover both the inside and outside of each tooth.
- Continue this motion as you work your way towards the front teeth. Pay extra attention to any areas that feel sensitive or have food particles stuck between them.
- Don’t forget to also clean the teeth on the other side of your mouth in the same manner.
- Finally, make sure to rinse your mouth with water after you have completed the irrigation process.
Remember, the key is to be gentle and thorough while cleaning each tooth. Take your time and ensure that you cover all areas of your mouth for effective results.
Step 7: Move the nozzle methodically
To move the nozzle methodically, start by placing it along the gum line. Move it slowly and deliberately, pausing briefly between each tooth. This allows the water jet to thoroughly clean the spaces between your teeth. For example, begin at the back of your mouth and work your way towards the front, ensuring that you reach all the areas between your teeth.
Step 8: Clean the tongue and roof of the mouth
Clean the tongue and roof of your mouth by redirecting the nozzle towards these areas. Gently move the nozzle back and forth to remove any bacteria or debris that may have accumulated. Ensure thorough cleaning by covering the entire surface of the tongue and the roof of your mouth.
Step 9: Rinse the device
- Detach the nozzle from the device.
- Rinse the nozzle thoroughly with clean water to remove any remaining cleaning solution or debris.
- Example: Hold the nozzle under a running faucet and allow the water to flow through it for a few seconds.
- Empty the water reservoir of the device.
- Clean the water reservoir using clean water.
- Example: Fill the reservoir halfway with clean water, swish it around, and then empty the water out.
Remember, thoroughly rinsing the nozzle and cleaning the water reservoir will help ensure the device is free from any residue or contaminants before its next use.
Step 10: Store the device properly
To properly store the oral irrigation device, follow these steps:
- After drying all the components, find a clean and dry place for storage.
- Make sure the device is kept away from direct sunlight, as exposure to sunlight can damage the device.
- Find a location that is easily accessible and convenient for future use.
- Ensure that the storage area is free from moisture and dust to prevent any damage or contamination.
By following these simple steps, you can ensure that your oral irrigation device is stored properly and remains in good condition for future use.
Achieving a Fresh and Healthy Smile
In conclusion, we can say that using an oral irrigation device is a great method for effectively cleaning between your teeth. By following the instructions outlined in this blog post, you can ensure a thorough and efficient cleaning process. However, it is always a good idea to consult with your dentist for any specific recommendations or concerns. Remember, taking care of your oral hygiene is crucial for maintaining a healthy smile. So, don’t hesitate to give oral irrigation a try and reap the benefits of cleaner and healthier teeth.
Gather Your Supplies
Enhancing Dental Hygiene
Getting Started with Oral Irrigation Devices
- Fill the reservoir: Begin by filling the reservoir of the oral irrigation device with lukewarm water. Make sure not to overfill it, as this can lead to leaks during usage
- Adjust the pressure: Most oral irrigation devices have adjustable pressure settings. Start with a lower pressure setting, especially if you are new to using these devices. Gradually increase the pressure to a comfortable level as you become more accustomed to it
- Position correctly: Hold the device in a way that allows you to comfortably reach all areas of your mouth. Lean over the sink to avoid any mess from the water spray. Position the tip of the device close to your teeth and gums, aiming for the space between them
- Start irrigating: Turn on the device and begin the irrigation process. Start with the back teeth and work your way towards the front, moving the tip along the gumline. Be thorough but gentle, ensuring the water jet reaches all areas of your mouth. Take breaks if needed and adjust the pressure as required
- Remember, using oral irrigation devices can be a bit challenging at first, but with practice, it will become easier. If you have any concerns or questions, don’t hesitate to consult your dentist or dental hygienist for guidance
Frequently Asked Questions about Oral Irrigation Devices
Are oral irrigation devices effective in removing plaque and preventing gum disease?
Yes, oral irrigation devices can be effective in removing plaque and preventing gum disease, but they should not be relied upon as the sole method of oral hygiene. These devices, also known as water flossers or dental water jets, use a stream of water to clean between the teeth and along the gumline. They can help remove food particles, bacteria, and plaque that may be missed by brushing and traditional flossing.
Research has shown that oral irrigation devices can be beneficial in reducing gum inflammation, bleeding, and the risk of gingivitis. They can also be particularly useful for individuals with braces, implants, or other dental appliances where traditional flossing may be challenging.
However, it’s important to note that while oral irrigation devices can be a valuable addition to your oral hygiene routine, they should not replace regular brushing and flossing. Brushing your teeth twice a day with a fluoride toothpaste and flossing daily are still crucial for maintaining good oral health.
If you have any specific concerns about gum disease or plaque buildup, we recommend consulting with your dentist or dental hygienist for personalized advice and recommendations. They can assess your oral health needs and provide guidance on the most effective oral hygiene practices for you.
Are there different types of oral irrigation devices available in the market?
Yes, there are indeed various types of oral irrigation devices available in the market. These devices are designed to help with oral health by removing plaque and food debris from the teeth and gums. Some popular types include water flossers, dental water jets, and air flossers. Each type has its own unique features and functions, allowing individuals to choose the one that suits their needs and preferences. While oral irrigation devices can be beneficial, it is important to consult with a dental professional to determine which type is most suitable for your oral health needs.


